the zone system for light metering black and white film
The zone system is a dead simple approach to metering (measuring) the light to determine the camera exposure settings. The exposure triangle of iso, aperature, and shutter speed controls firstly the amount of light exposed on the filmstock (or digital sensor). Additionally, each 'leg' has its own effects on the final image.1
The zone system is simplest when fixing 2 of the 3 legs in the exposure triangle. The zone system helps determine the third leg to render each part of the image as we want.
There is no "correct" exposure for any image. There is definitely an exposure that is more traditional but it is up to the user to decide how they want to make the photograph.
what is the zone system though
Typically the zone system covers a range of 11 stops of light, and gives the user a way to visualize how each part of the scene will render ahead of taking the image (more directly, what shade of black/white each part will come out as). This was originally developed (buh dum tss) by Ansel Adams. Some pros now use 15 or even 18 stops where they have had their processes dialed in over a long number of years. The latitude of a given film stock is hard to pin down in general, but it's agreed that most modern stocks can capture at least 5 stops of light no problem2. You want more than 5 stops for the zone system because you may want your image to be very dark (a bar scene) or very bright (desert landscape) and you likely won't use the full 11 stops of range (this would be the now popular digital HDR image style).
Using 11 stops, the zone system table looks like this.
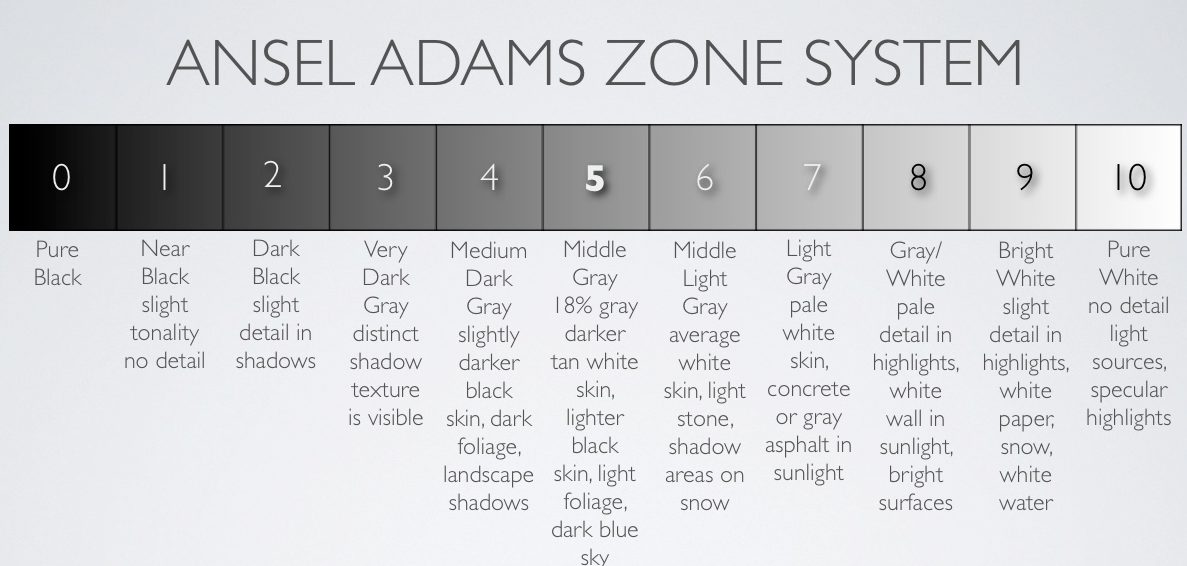
Middle gray is what any light meter meters for. Exposure at that setting will make that object render as middle gray, zone 5. Moving to the right is getting brighter (more stops of light).
Zone 6/7 is generally used for portraits with caucasian skin so that it renders "naturally" i.e. close to how it appears in reality with your eyes but in grayscale. The limit for a bright texture is around zone 8 or 9. Zone 10 is pure white with no texture or any information at all. Sometimes this is done purposefully and called "white clipping".
Moving left from zone 5 it gets darker. Zone 2 is generally the limit for dark textures, where some sense of detail can still be obtained in the final image. Zone 0 is pure black with no details at all.
How to zone system
A lot of scenes have a wide range of light and thus could be exposed at many settings (or any setting, you can do whatever you want as the artist). The zone system is meant to assist visualization so there's no surprises or disappointments after developing the film.
Say we have 400 iso film, and we select f/8 for the scene. With the iso and aperture fixed, spot meter parts of scene for the shutter speed,
- Meter the darkest and lightest parts of the scene, make a note
- Meter the subject and any other critical parts of the image, make a note
- Place those measurements in a table spaced by the number of stops apart
It's important to spot meter so that we get the light values for the object only. Most cameras have either an average meter which covers the entire FOV, or a center-weighted meter. In those cases you could zoom into the object, use a dedicated spot meter, or a phone app.
Lets say we metered the subject at 1/60, the highlights at 1/250, and the shadows at 1/4. From the darkest measurement to the highest there is a span of 7 stops. The zone system will help us decide where on that range to set the camera for the image we want. For a start, place the subject at zone 5, and the other measurements separated by the number of stops. Zone 5 is always what you set your camera to for the final image.
| Shade | Pure Black | dark texture | Middle Gray | light texture | Pure White | ||||||
|---|---|---|---|---|---|---|---|---|---|---|---|
| Zone | 0 | 1 | 2 | 3 | 4 | (5) | 6 | 7 | 8 | 9 | 10 |
| Ex 1 | 1/4 | (1/60) | 1/250 | ||||||||
| Ex 2 | 1/4 | (1/8) | 1/60 | 1/250 | |||||||
| Ex 3 | 1/4 | (1/30) | 1/60 | 1/250 |
Example 1 places the subject in zone 5 which will render it as middle gray. For this example, we would set the camera to 1/60 at f/8 and 400 iso. Exposure at this setting lets the other parts "fall into" zones 1 and 7. This would make the shadows in zone 1, not very much detail. This exposure would also make the brightest part of the image only zone 7. The resulting final image would be very dark and moody, with no whites at all. If this is the desired effect, you're done! Snap the picture at 1/60.
If the above isn't the goal, move the measurements around. Example 2 places the highlights in zone 10, keeping the same spacing, the shadows would now be in zone 4 and the subject in zone 8. This would be a very bright image. The exposure setting is whatever lands in zone 5, here it would be one stop above the shadow and we'd set the camera to 1/8 at f/8 and 400 iso.
The third example would be the most traditional setup. The subject placed in zone 6, and letting the shadows and highlights fall into zone 2 and 8 respectively. This would give a well balanced image, retaining shadow detail and a well lit subject with textured highlights. We would set the camera to 1/30 at f/8 and 400 iso.
All of these examples are correct! It depends what the intention is. Doing an average reading of the entire scene will work on average but not every situation. An average reading might give you 1/30s and that could work out perfectly fine! The zone system helps the photographer be more intentional with their work and make images above average.
In the future I plan on expanding this post with test images from my own setup to demonstrate for others and also for my own reference. Hope you enjoyed or learned something!
Bruce
Footnotes
The aperture determines how much is in focus ('sharp') or blurred. The shutter speed can allow motion blur (low speed, 1/30s) or freeze motion in place (high speed, 1/2000s). The iso in analog photography is determined by the physical filmstock loaded in the camera. In digital, the iso is always free to move and the effect is added sensor noise due to voltage gain. While the nominal film speed is set by the chemistry from the manufacturer, there is still control for the photographer with this leg. They can push or pull speed on the film and then compensate (or not) when developing. This has other neat effects on the final image, some day I'll write about that.↩
Slide films for example can generally only get 3 or 4 stops and do very poorly with overexposure. This makes stuff like Ektachrome hard to shoot for beginners, you have to nail the exposure to get a usable image. Something more forgiving is stuff like Kodak Ultra 400, which is meant for casual photography like family vacations or disposable point and shoots. Someone like drunk Uncle John isn't going to use the zone system, they'll just line up the camera and hit the button. The latitude of the filmstock is generous enough to handle a very bad exposure setting.↩